CloudStack
Apache CloudStack is open-source cloud computing software. It is used to deploy a infrastructure as a service (IaaS) platform on virtualization technologies such as KVM, VMware, and Xen. This is similar to OpenStack but is significantly simpler to setup and manage (albeit with less features).
This page contains my notes on setting up and using CloudStack 4.15. I am by no means a CloudStack expert so take my notes here with a huge grain of salt and feel free to make corrections.
Installation
This installation is based on CloudStack 4.15 using CentOS 8. The setup described below uses KVM and Open vSwitch. I'm basing the design decisions and approach from the installation guide at http://docs.cloudstack.apache.org/en/latest/quickinstallationguide/qig.html
Overview
I will have 1 management node and a few bare metal nodes. All nodes will have the same processor (Intel something) and memory (24GB).
Each node will have the same network configuration based on OpenVSwitch. There will be only 1 ethernet connection per node with various VLANs trunked to each node. The VLANs are:
| Network | Vlan | Network subnet |
|---|---|---|
| Management | 11, untagged | 172.19.0.0/20 |
| Storage | 3205 | 172.22.0.0/24 |
| Guest | 100 - 200 | n/a |
| Public | 2 | 136.159.1.0/24 |
The network configs for the 4 nodes I'll be using are listed below. There is also a NFS server used for primary storage. The reason for the weird IPs is because this was set up on an existing network.
| Node | Networks |
|---|---|
| management | Management: 172.19.12.141/20
Storage: 172.22.0.241/24 |
| baremetal1 | Management: 172.19.12.142/20
Storage: 172.22.0.242/24 |
| baremetal2 | Management: 172.19.12.143/20
Storage: 172.22.0.243/24 |
| baremetal3 | Management: 172.19.12.144/20
Storage: 172.22.0.244/24 |
| netapp1 | Storage: 172.22.0.19/24 |
Switch config
For completeness, here's the configuration of the HP Procurve switch that the nodes are connected to. The switch should have all the guest VLANs defined and tagged.
config

# Guest VLANs
vlan 100 name guest100
vlan 101 name guest101
...
vlan 200 name guest 200
interface 1-8 tagged vlan 100-200

# Public, management, storage VLANs
vlan 2 name public
vlan 11 name management
vlan 3205 name storage
interface 1-8 untagged vlan 11
interface 1-8 tagged vlan 2,3205
Node setup
Each node will be set up with the following sub-steps.
CloudStack Repos
Install CloudStack repos.
# cat > /etc/yum.repos.d/cloudstack.repo <<EOF
[cloudstack]
name=cloudstack
baseurl=http://download.cloudstack.org/centos/8/4.15/
enabled=1
gpgcheck=0
EOF
Install base packages
Install all other dependencies.
# yum -y install epel-release
# yum -y install bridge-utils net-tools
Install OpenVSwitch from CentOS Extras:
# yum -y install \
http://mirror.centos.org/centos/8/extras/x86_64/os/Packages/centos-release-nfv-openvswitch-1-3.el8.noarch.rpm \
http://mirror.centos.org/centos/8/extras/x86_64/os/Packages/centos-release-nfv-common-1-3.el8.noarch.rpm
Disable SELinux
The system should have SELinux disabled. Use setenforce and edit the selinux config:
# setenforce 0
# vi /etc/selinux/config
## disable selinux
Disable firewalld
# systemctl stop firewalld
# systemctl disable firewalld
Configure Open vSwitch
# echo "blacklist bridge" >> /etc/modprobe.d/local-blacklist.conf
# echo "install bridge /bin/false" >> /etc/modprobe.d/local-dontload.conf

# systemctl enable --now openvswitch
We will be using network-scripts to configure the Open vSwitch bridges later. I removed NetworkManager but retained network-scripts to ensure NetworkManager doesn't interfere with my network setup. The install guide leaves NetworkManager around.
I create a 'shared' bridge that's tied to the network interface called nic0. This was done to make it easier to change the bridge setup during my testing but this could be simplified. Each of the physical networks I later set up in CloudStack are its own individual bridge to make it obvious how VMs get connected to the network.
# ovs-vsctl add-br   nic0
# ovs-vsctl add-port nic0 enp4s0f0 tag=11 vlan_mode=native-untagged
# ovs-vsctl set port nic0 trunks=2,11,40-49,3205

# ovs-vsctl add-br management0 nic0 11
# ovs-vsctl add-br cloudbr0 nic0 2
# ovs-vsctl add-br cloudbr1 nic0 100
# ovs-vsctl add-br storage0 nic0 3205
The node's management IP address needs to be removed from the primary network interface and then assigned on the management0 interface. If you're doing this to a node remotely, this might interrupt your connection.
# ip addr del 172.19.12.141/20 dev enp4s0f0
# ip addr add 172.19.12.141/20 dev management0
# ip route add default via 172.19.0.3
# ip addr add 172.22.0.241/24 dev storage0

# ip link set management0 up
# ip link set storage0 up
Network configuration
Once the Open vSwitch bridges are set up, configure the interfaces as follows:
| Network Interface | Role | Configuration |
|---|---|---|
| enp4s0f0 | primary NIC in the host | up on boot; no IP |
| nic0 | network OVS switch that connects to the other bridges to the NIC | up on boot; no IP |
| cloudbr0 | public traffic. | up on boot; no IP |
| cloudbr1 | guest traffic | up on boot; no IP |
| management0 | management traffic | up on boot; assigned with management IP |
| storage0 | storage traffic | up on boot; assigned with storage network IP |
| cloud0 | link local traffic | up on boot; assigned 169.254.0.1/16 |
Network configs are applied using network-scripts. The idea here is to have the network interfaces be configured when the system boots automatically. For interfaces that require a static IP address, I used the following network-scripts file. Adjust the device name and IP address as required.
# cat <<EOF > /etc/sysconfig/network-scripts/ifcfg-cloudbr0
DEVICE=cloudbr0
TYPE=Bridge
ONBOOT=yes
BOOTPROTO=static
IPV6INIT=no
IPV6_AUTOCONF=no
DELAY=5
IPADDR=172.16.10.2
GATEWAY=172.16.10.1
NETMASK=255.255.255.0
DNS1=8.8.8.8
DNS2=8.8.4.4
USERCTL=no
NM_CONTROLLED=no
EOF
For devices that don't require a static IP:
cat <<EOF > ifcfg-cloudbr0
DEVICE=cloudbr0
TYPE=OVSBridge
DEVICETYPE=ovs
ONBOOT=yes
BOOTPROTO=none
HOTPLUG=no
NM_CONTROLLED=no
EOF
Once configured, verify that your node comes up with the proper network settings on a reboot.
Management node setup
On the management node, set up the network configs and the CloudStack management packages.
Setup Storage
If you intend to use the management server as the primary and secondary storage, you will need to set up a NFS server. If you intend to use an external NFS server as the primary storage, you can skip this step.
# mkdir -p /export/primary /export/secondary
# yum -y install nfs-utils
# cat > /etc/exports <<EOF
/export/secondary *(rw,async,no_root_squash,no_subtree_check)
/export/primary *(rw,async,no_root_squash,no_subtree_check)
EOF
# systemctl enable --now nfs-server
CloudStack management services
Install MySQL. MariaDB isn't supported and the installation fails with it.
# rpm -ivh http://repo.mysql.com/mysql80-community-release-el8.rpm
# yum -y install mysql-server
# yum -y install mysql-connector-python

## edit /etc/my.cnf to have the following lines.
cat >> /etc/my.cnf <<EOF
[mysqld]
innodb_rollback_on_timeout=1
innodb_lock_wait_timeout=600
max_connections=350
log-bin=mysql-bin
binlog-format = 'ROW'
EOF

# systemctl enable --now mysqld
Setup CloudStack.
# yum -y install cloudstack-management

# cloudstack-setup-databases cloud:password@localhost --deploy-as=root
# cloudstack-setup-management
# systemctl enable --now cloudstack-management
After starting cloudstack-management for the firs time, it might take from 2-10 minutes for the database to set up completely. During this time, the web interface won't be responsive. In the mean time, you will need to seed the system VM images to the secondary storage. If you are using an external NFS server for your secondary storage, adjust the mount point in the following command accordingly.
## Seed the systemvm into secondary storage
# /usr/share/cloudstack-common/scripts/storage/secondary/cloud-install-sys-tmplt -m /export/secondary -u https://download.cloudstack.org/systemvm/4.15/systemvmtemplate-4.15.1-kvm.qcow2.bz2 -h kvm -F
We will continue the setup process via the web interface after setting up a bare metal node.
Bare metal node setup
You should set up at least one bare metal node which will be used to set up your first zone and pod.
On a bare metal node, set up everything outlined in the Node setup section above. The node should have the CloudStack repos, Open vSwitch, SElinux/firewalld, and the networking configured. The agent node must have virtualization enabled on the CPU and KVM should be installed. You should be able to find /dev/kvm on the system.
CloudStack Agent
To set up the node, install the cloudstack-agent package.
# yum -y install cloudstack-agent
Configure qemu and libvirtd. If you need some starting configs, try the following:
## edit /etc/libvirt/qemu.conf
vnc_listen=0.0.0.0

## edit /etc/libvirt/libvirtd.conf
listen_tcp = 1
tcp_port = "16509"
listen_tls = 0
tls_port = "16514"
auth_tcp = "none"
mdns_adv = 0
The CloudStack install guide instructs you to edit the libvirtd arguments to --listen, but this will prevent libvirtd from starting using systemd. Instead, you should skip this step entirely because the CloudStack agent will configure this for you when you add the node to a zone.
## The install guide suggests editing /etc/sysconfig/libvirtd to use the listen flag.
## However, this only works if you're not using systemd or using the libvirtd-tcp socket.
## I skipped this step since the agent will configure this later on.
LIBVIRTD_ARGS="--listen"
Start the CloudStack agent. Verify that the cloudstack-agent is running. At this point libvirtd should also running (it's a service dependency).
With the agent running on the node, you should now be able to add the node to the CloudStack cluster. This process will rewrite the libvirtd.conf file and it should set listen_tcp=0 and listen_tls=1 for you (so that libvirt traffic such as migrations are done via TLS rather than basic TCP).
Allow sudo access
Ensure that /etc/sudoers does not require TTY. In the older documentation, CloudStack requires that the 'cloud' user be able to sudo with the addition of Defaults:cloud !requiretty. However, looking at the installation on the CentOS 8 box, the agent actually runs as root, so perhaps root needs to be able to sudo?
Setting up your first zone
At this point in the process, you should have at least one bare metal host and your management node should be up and running and it should be serving the CloudStack web UI at http://cloudstack:8080/client. Login using the default admin / password credentials.
You will be greeted with a setup wizard. I have had no luck with this and it's better to ignore it. Instead, navigate to Infrastructure -> zones and manually set up your first zone.
| Description | Screenshot |
|---|---|
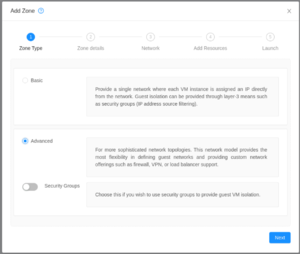
There are 3 types of zones that you can create:
Be aware of each type's limitations before continuing. We will be creating an advanced network zone. |
|
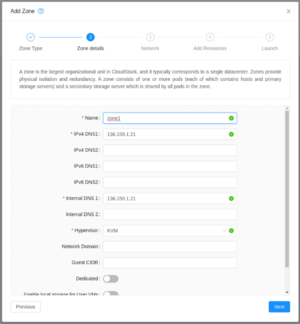
| We will add the DNS resolvers for the zone and specify the hypervisor type (KVM).
Empty the guest CIDR since we're going to allow users to specify their own. |
|
| When using the advanced zone, you need to specify the physical networks for the management, storage, and public networks.
These should correspond to the physical network devices on the hypervisor. Recall that in the previous step where we set up the Open vSwitch bridges, we created the following bridges for each role:
|
|
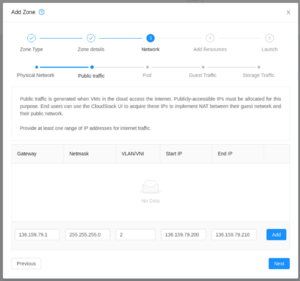
| Specify the public network. The addresses defined here populates the 'Public IP' pool.
All isolated guest networks and all VPCs will use one of the addresses defined in this pool for the SNAT/NAT. The addresses specified here should therefore be accessible from the internet. |
|
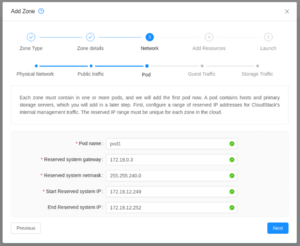
| Create a new pod.
The pod network here should cover your management network subnet. The reserved IP addresses here will be used by system VMs that require access to the management network. |
|
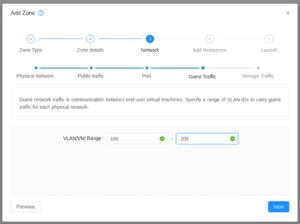
| Specify the guest network VLAN range.
Because we're using VLAN as an isolation method, this range specifies what VLANs the guest networks will use over the guest physical network. |
|
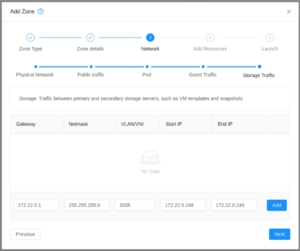
| Specify the storage network.
The reserved start/end IPs will be used by system VMs that require access to the primary storage. If you are assigning static IPs on your bare metal hosts, ensure that the reserved addresses don't overlap with the IP range specified here (because I had CloudStack assign a VM with the same IP as a bare metal host) |
|
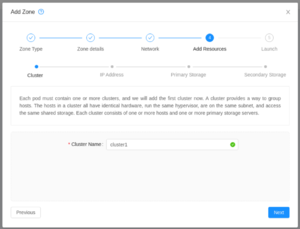
| Specify a cluster name. | |
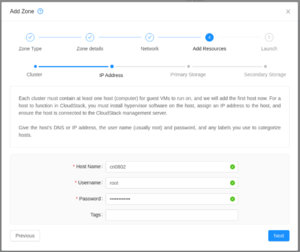
| Add your first bare metal host.
You must add one host now and can add additional ones later. |
|
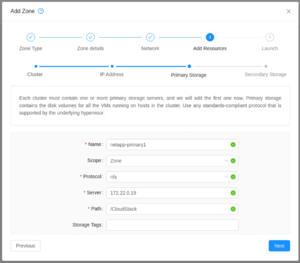
| Specify your primary storage.
The server should be accessible from the storage network. |
|
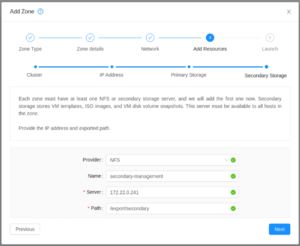
| Specify your secondary storage.
You need to have at least one NFS secondary storage that has been seeded with the system VM template. Secondary storage pools should be accessible from the management network (confirm?) |
|
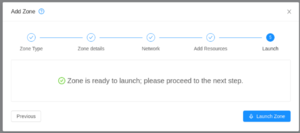
| Launch the zone.
This step might take a few minutes. If all goes well, you can then enable the zone shortly after. If you run into any problems, check the logs on the management node at /var/log/cloudstack/management. |
Once your zone has been enabled, it should automatically start a Console Proxy VM and secondary storage VM. You can find this under Infrastructure -> System VMs. If for some reason the System VMs are not starting, check that your systemvm template is available in your secondary storage and that the cloud0 bridge on each host is up. You should be able to ping the link local IP address (the 169.254.x.x address) from the hypervisor.
Once the two system VMs are running, verify that you're able to create new guest networks or VPCs. These networks should create a virtual router.
Configuration
Service offerings
Deployment planner
There are a few deployment techniques that can be used. These are set within a compute offering and cannot be changed after it's been created (really? can we change it via API?). The options are:
| Deployment planner | Description |
|---|---|
| First fit | Placed on the first host that has sufficient capacity |
| User dispersing | Evenly distributes VMs by account across clusters |
| User concentrated | Opposite of the above. |
| Implicit dedication | requires or prefers (depending on planner mode) a dedicated host |
| Bare metal | requires a bare metal host |
More information from CloudStack's documentation on Compute and Disk Service Offerings.
Enable SAML2 authentication
Enable the SAML2 plugin by setting saml2.enabled=true under Global Settings.
Set up SAML authentication by specifying the following settings:
| Setting | Description | Example value |
|---|---|---|
| saml2.default.idpid | The URL of the identity provider. This is likely obtained from the metadata URL and set by the SAML2 plugin every time CloudStack starts. | https://sts.windows.net/c609a0ec-xxx-xxx-xxx-xxxxxxxxxxxx/ |
| saml2.idp.metadata.url | The metadata XML URL | https://login.microsoftonline.com/609a0ec-xxx-xxx-xxx-xxxxxxxxxxxx/federationmetadata/2007-06/federationmetadata.xml?appid=c5b8df24-xxx-xxx-xxx-xxxxxxxxxxxx |
| saml2.sp.id | The identifier string for this application | cloudstack-test.my-organization.tld |
| saml2.redirect.url | The redirect URL using your cloudstack domain. | https://cloudstack-test.my-organization.tld/client |
| saml2.user.attribute | The attribute to use as the username.
If you're not sure what's available, look at the management logs after a login attempt. |
For Azure AD, use the email address attribute: http://schemas.xmlsoap.org/ws/2005/05/identity/claims/emailaddress |
Restart the management server. To allow a user access, create the user and enable SSO. The user's username must match the value that's obtained from the saml2.user.attribute field.
Bugs
SAML Request being rejected by Azure AD
If you are using Azure AD, you may have issues authenticating because the SAML request ID that's generated might begin with a number. When this happens, you will get an error similar to: AADSTS7500529: The value '692rv91k6dgmdas33vr3b2keahr4lqjv' is not a valid SAML ID. The ID must not begin with a number.. For more information, see: https://github.com/apache/cloudstack/issues/5548
Users cannot login via SSO
Users that will be using SAML for authentication will need to have their CloudStack accounts created with SSO enabled. There seems to be a bug with the CloudStack web UI where a user's SAML IdPID isn't settable (it gets set to a '0'). A work-around would be to create and authorize users via CloudMonkey.
The steps on adding a new user are:
- Create the user:
create user firstname=First lastname=User email=user1@ucalgary.ca username=user1@ucalgary.ca account=RCS state=enabled password=asdf - Find the user's ID:
list users domainid=<tab> filter=username,id - Authorize the user:
authorize samlsso enable=true entityid=https://sts.windows.net/c609a0ec-xxx-xxx-xxx-xxxxxxxxxxxx/ userid=user-id - Verify that the user is enabled for SSO:
list samlauthorization filter=userid,idpid,status
When authorizing a user, the entityid must be the URL of the identity provider. The end slash is also mandatory.
Enable SSL
A few things to note about enabling SSL:
- If you added hosts via IP address, enabling SSL would likely break the management-to-client connection. You might need to re-add the host so that the certificates all match up.
- On CloudStack 4.16, the button to upload a new certificate in the SSL dialog box does not work. This is fixed in 4.16.1.
Preparing your SSL certificates
First, generate a private key and certificate signing request and then obtain your SSL certificate from a certificate authority. For a typical CloudStack installation, you should obtain SSL certificates for both your management server as well as your console proxy.
# openssl genrsa -out server.key 4096
# openssl req -new -sha256 \
         -key server.key \
         -subj "/C=CA/ST=Alberta/O=Steamr/CN=cloudstack-test.example.com" \
         -reqexts SAN \
         -extensions SAN \
         -config <(cat /etc/pki/tls/openssl.cnf <(printf "[SAN]\nsubjectAltName=DNS:cloudstack-test-console.example.com")) \
         -out server.csr
## With the server.csr file, upload it to your Certificate Authority to obtained a signed certificate.
Your certificate authority should have given you your signed certificate as well as the root and any other intermediate certificates in a X.509 (.crt) format. If you need to self sign this certificate signing request, do the following:
## Run the following only if you want to self sign your certificate
## Make your root CA
# openssl genrsa -des3 -out rootCA.key 4096
# openssl req -x509 -new -subj "/C=CA/ST=Alberta/O=Steamr/CN=example.com" -nodes -key rootCA.key -sha256 -days 1024 -out rootCA.crt

## Sign the certificate
# openssl x509 -req -in server.csr -CA rootCA.crt -CAkey rootCA.key -CAcreateserial -out server.crt -days 500 -sha256

## Check the certificate
# openssl x509 -in server.crt -text -noout
Next, you need to convert your certificate into a PKCS12 format and your private key into a PKCS8 format. This is the only format that works with the CloudStack management server. We place the PKCS12 keystore file at /etc/cloudstack/management/ssl_keystore.pkcs12.
## Combine Files
# cat server.key server.crt intermediate.crt root.crt > combined.crt

## Create keystore
## You may use 'password' as the password
# openssl pkcs12 -in combined.crt -export -out combined.pkcs12

## Import keystore
## Provide the same password above. Eg. 'password'
# keytool -importkeystore -srckeystore combined.pkcs12 -srcstoretype PKCS12 -destkeystore /etc/cloudstack/management/ssl_keystore.pkcs12 -deststoretype pkcs12

## Convert the private key into PKCS8 format
## Provide the same password above. Eg. 'password'
# openssl pkcs8 -topk8 -in server.key -out server.pkcs8.encrypted.key
# openssl pkcs8 -in server.pkcs8.encrypted.key -out server.pkcs8.key
Upload SSL certificates
You can upload SSL certificates to CloudStack under Infrastructure -> Summary and then clicking on the 'SSL Certificates" button. Provide the root certificate authority, the certificate, the private key (in PKCS8 format), and the domain that the certificate applies to. Wildcard domains should be specified as *.example.com.
Alternatively, you may use the CloudMonkey tool to upload certificates using the file parameter passing feature like so:
# cmk upload customcertificate domainsuffix=cloudstack.steamr.com id=1 name=root certificate=@root.crt
# cmk upload customcertificate domainsuffix=cloudstack.steamr.com id=2 name=intermediate1 certificate=@intermediate.crt
# cmk upload customcertificate domainsuffix=cloudstack.steamr.com id=3 privatekey=@server.pkcs8.key certificate=@domain.crt
Enabling HTTPS
Next, you will need to enable HTTPS on both the management console and console proxy.
Note that you may enable the HTTPS setting only after at least one certificate has been uploaded. If the server has no certificates, the option is ignored.
Enable HTTPS on the management console
The management console can be configured by editing /etc/cloudstack/management/server.properties with the following lines. Set the keystore password to the same password you used above to import it.
https.enable=true
https.port=8443
https.keystore=/etc/cloudstack/management/ssl_keystore.pkcs12
https.keystore.password=password
Restart the management server for this to apply.
Why port 8443?
Because CloudStack runs under a non-root account, it can only bind to high port (> 1024) numbers. You can still have CloudStack visible on port 443 if you use a IPTables rule.Confirm that you are able to reach your management console via HTTPS.
Enable HTTPS on the console proxy
If you enable SSL on the management console, you will also need to enable SSL for the console proxies for the VNC web sockets to work properly. If your management console certificate (from the previous sections) contain a Subject Alternative Name (SAN) or is a wildcard certificate that includes your console proxy's DNS name, SSL for the console proxy should be working. If your certificates do not include the console proxy's DNS name, you will need to obtain another SSL certificate and add it to the SSL keystore and upload it to CloudStack using the same instructions above.
Renewing SSL certificate
To renew a SSL certificate, you'll have to ensure that the keystore is updated and also upload the certificate via CloudMonkey or the management console (under Summary -> Certificates).
In a folder containing your certificate (server.crt), intermediate and root certificates (intermediate.crt, root.crt), and also your private key (server.key), run the following to update your SSL keystore and upload the certificates via cmk:
# cat server.key server.crt intermediate.crt root.crt > combined.crt

## Note the keystore location that's defined in your configs
# grep https.keystore /etc/cloudstack/management/server.properties
https.keystore=/etc/cloudstack/management/ssl_keystore.pkcs12
https.keystore.password=xxxxxxx

## Create keystore and import your certificate into it.
# openssl pkcs12 -in combined.crt -export -out combined.pkcs12
# keytool -importkeystore -srckeystore combined.pkcs12 -srcstoretype PKCS12 -destkeystore ssl_keystore.pkcs12 -deststoretype pkcs12

## Move the keystore over the existing one as defined in the server config. You may want to backup the old one just in case.
# mv /etc/cloudstack/management/ssl_keystore.pkcs12 /etc/cloudstack/management/ssl_keystore.pkcs12-org
# mv ssl_keystore.pkcs12 /etc/cloudstack/management/ssl_keystore.pkcs12

## Convert your key to pkcs8 if you haven't already done so. Use the same password for both commands.
# openssl pkcs8 -topk8 -in server.key -out server.pkcs8.key-encrypted
# openssl pkcs8 -in server.pkcs8.key-encrypted -out server.pkcs8.key

## Upload your certificate
# for domain in $(openssl x509 -in server.crt -text -noout | grep DNS: | tr -d , | sed 's/DNS://g') ; do
        echo "Uploading domain for $domain"

        cmk upload customcertificate domainsuffix=$domain id=1 name=root certificate=@root.crt
        cmk upload customcertificate domainsuffix=$domain id=2 name=intermediate1 certificate=@intermediate.crt
        cmk upload customcertificate domainsuffix=$domain id=3 privatekey=@server.pkcs8.key certificate=@server.crt
done
Tasks
Re-add existing KVM bare metal host
Once a host has been added to CloudStack, the CloudStack agent will have generated some public/private keys and configured itself to talk to the management node. If you need to remove and re-add a host, you will need to clean up the agent before re-adding it back to CloudStack again. Based on my experience, I had to do the following:
- Before removing the host from CloudStack, drain it of all VMs.
virsh listshould be empty. If not and you've removed the host from the management server already, manually kill each VM withvirsh destroy. systemctl stop cloudstack-agentrm -rf /etc/cloudstack/agent/cloud*- unmount any primary storages with
umount /mnt/*and clean up withrmdir /mnt/* systemctl stop libvirtdrm -rf /var/lib/libvirt/qemu- You may need to edit
/etc/sysconfig/libvirtdto not use the listen flag. This might prevent libvirtd (and subsequently cloudstack-agent) from starting. - Edit
/etc/cloudstack/agent/agent.propertiesand remove the keystore passphrase, any UUIDs, cluster/pod/zone, and the host. You should keep the guid or regenerate it with uuidgen. You should also keep the public/private/guest network devices set. - Restart with
systemctl start cloudstack-agent(libvirt should come up automatically as it's a dependency). Ensure that it comes up OK.
You may then re-add the host back to CloudStack.
Building RPMs
To build the RPM packages from scratch, you'll need to install a bunch of dependencies and then run the build script. For more information, see:
- https://docs.cloudstack.apache.org/en/4.15.2.0/installguide/building_from_source.html#building-rpms-from-source
# yum groupinstall "Development Tools"
# yum install java-11-openjdk-devel genisoimage mysql mysql-server createrepo
# yum install epel-release

# curl -sL https://rpm.nodesource.com/setup_12.x | sudo bash -
# yum install nodejs

# cat <<EOF > /etc/yum.repos.d/mysql.repo
[mysql-community]
name=MySQL Community connectors
baseurl=http://repo.mysql.com/yum/mysql-connectors-community/el/$releasever/$basearch/
gpgkey=http://repo.mysql.com/RPM-GPG-KEY-mysql
enabled=1
gpgcheck=1
EOF
# yum -y install mysql-connector-python

enable powertools

# yum install jpackage-utils maven

# git clone https://github.com/apache/cloudstack.git
# cd cloudstack
# git checkout 4.15

# cd packaging
# sh package.sh --distribution centos8
Rebuilding UI
CloudStack's web interface is bundled with the pre-built cloudstack-ui package. If you need to make any custom changes to the UI, you can follow the build instructions from the README file under the ui directory.
Building the UI is a straight forward process once you have all the necessary software dependencies in place. Once the UI is built, you can then install it on the management server and have it served instead of the 'stock' bundled UI.
Building the UI
You will need a server with npm installed along with a copy of the CloudStack repo. The simplest way I've found to accomplish this is to create the following Docker image and then run the build process within the container.
FROM rockylinux/rockylinux:8.10

RUN curl -sL https://rpm.nodesource.com/setup_16.x | bash -
RUN yum -y install nodejs
Clone the CloudStack repo (I placed it in /tmp in this example) and then run the following:
# docker build -t cs-ui-builder --progress=plain --no-cache .

# docker run --rm -ti \
        -v /tmp/cloudstack:/cloudstack \
        -v /tmp/npm:/root/.npm cs-ui-builder \
        bash -c "cd /cloudstack/ui; npm install; npm run build"
We make a volume for the .npm directory to help speed up subsequent builds as the npm dependencies are cached, but this is entirely optional.
Installing the UI
- Copy the
dist/directory to/usr/share/cloudstack-management/webapp/ - Edit
/etc/cloudstack/management/server.propertiesand make sure thatwebapp.diris set to:webapp.dir=/usr/share/cloudstack-management/webapp
Restart the CloudStack management service and then reload the console page. Ensure that the vue app isn't cached.
Installing and using CloudStack's prebuilt UI
The cloudstack-ui package contains the prebuilt CloudStack UI. The location of the UI files are placed under /usr/share/cloudstack-ui.
As of CloudStack 4.18, when I tried using this prebuilt package, I had to do the following things:
- Edit
/etc/cloudstack/management/server.propertiesand setwebapp.dir=/usr/share/cloudstack-ui - In
/usr/share/cloudstack-ui, run:find . -type d -exec chmod -v o+x {} \;because the directories aren't executable by the 'cloud' user. - Create /usr/share/cloudstack-ui/WEB-INF and place this web.xml file within. Otherwise, requests to the API break.
Usage server
Install cloudstack-usage. Start it and restart the management server. Set enable.usage.server=true in global settings.
The usage data will be stored in the usage database on your management server. Metrics are gathered daily and can be viewed through Cloud Monkey. There is no option to view this data in the management console.
The collected data is coarse in nature, but it should be sufficient enough for you to determine an account or VM's resource utilization over a time period of a day or more and should be good enough to implement a rough billing / showback amount.
Adding some Linux templates
You can add the "Generic Cloud" qcow2 disk images as a system template to CloudStack.
Because these cloud images uses cloud-init, you will need to provide some custom userdata when deploying these images. Userdata will only work when the VM is deployed on a network that offers the "User Data" service offering. If you can't use userdata or if you want the VMs to come up with a specific root password, you can use virt-customize to set the root password on the qcow2 file.
| Distro | Type | URL |
|---|---|---|
| Rocky Linux 8.4 | CentOS 8 | https://download.rockylinux.org/pub/rocky/8.4/images/Rocky-8-GenericCloud-8.4-20210620.0.x86_64.qcow2 |
| CentOS 8.4 | CentOS 8 | https://cloud.centos.org/centos/8/x86_64/images/CentOS-8-GenericCloud-8.4.2105-20210603.0.x86_64.qcow2 |
| Fedora 34 | Fedora Linux (64 bit) | https://download.fedoraproject.org/pub/fedora/linux/releases/34/Cloud/x86_64/images/Fedora-Cloud-Base-34-1.2.x86_64.qcow2 |
| Ubuntu Server 21.04 | http://cloud-images.ubuntu.com/hirsute/current/hirsute-server-cloudimg-amd64.img
You need to convert img to qcow with qemu-img:
|
Here's an example of a cloud-init configuration which you would put in the userdata field when deploying a VM:
#cloud-config
hostname: vm01
manage_etc_hosts: true
users:
  - name: vmadm
    sudo: ALL=(ALL) NOPASSWD:ALL
    groups: users, admin
    home: /home/vmadm
    shell: /bin/bash
    lock_passwd: false
ssh_pwauth: true
disable_root: false
chpasswd:
  list: |
    vmadm:vmadm
  expire: false
Importing a VMware Virtual Machine
To import a VMware virtual machine:
- Copy the virtual machine's .vmdk disk file to a CloudStack node
- Convert the .vmdk into a .qcow format using the qemu-img convert command. Eg.
qemu-img convert -f linux.vmdk -O linux.qcow2 - Run the file command on the qcow disk and make a note of its size (in bytes).
- Create a new virtual machine in CloudStack. Use an ISO and not a template. Set the size of the VM's ROOT disk to match the disk size noted from the previous step.
- Start and stop the VM to ensure the virtual disk is created. Make a note of the virtual disk's ID.
- Copy the converted qcow disk over the existing virtual disk image in the primary storage.
- Restart the VM in CloudStack.
Some things to note with this process:
- The disk subsystem might differ between KVM and VMware. As a result, you may need to rebuild the initrd file so that it has the necessary drivers to boot properly.
Increasing the management console's timeout
The default timeout is 30 minutes. You may adjust the number of minutes in the session.timeout value stored in /etc/cloudstack/management/server.properties.
session.timeout=60
Restart the cloudstack-management service to apply.
Upgrade CloudStack
Before upgrading CloudStack, review the upgrade instructions from CloudStack's documentation. For 4.17 to 4.18, see: https://docs.cloudstack.apache.org/en/4.18.0.0/upgrading/upgrade/upgrade-4.17.html
In a nutshell, upgrading CloudStack for KVM hosts requires the following steps:
- Before upgrading, load the next systemvm template image. System templates are available from: http://download.cloudstack.org/systemvm/. The systemvm template for KVM should be named something like:
systemvm-kvm-4.18.0. When adding the template, specify qcow2 as its format. - Backup your CloudStack and usage database.
$ mysqldump -u root -p -R cloud > cloud-backup_$(date +%Y-%m-%d-%H%M%S)
$ mysqldump -u root -p cloud_usage > cloud_usage-backup_$(date +%Y-%m-%d-%H%M%S)
- If you have outstanding system packages to upgrade, do so now (excluding CloudStack packages) and reboot.
- Stop the CloudStack Management server. Manually unmount any CloudStack mounts. I had to do when I upgraded from 4.16 to 4.17 since it prevented CloudStack from starting. Upgrade the cloudstack-management and cloudstack-common packages. Restart CloudStack.
# systemctl stop cloudstack-management
# umount /var/cloudstack/mnt/*
# yum -y update cloudstack\*
# systemctl start cloudstack-management
- Ensure things are running. Watch the logs in
tail -f /var/log/cloud/management/*log. Verify that the management server can still communicate with the hosts. - For each CloudStack host, drain it of hosts, stop the cloudstack-agent service, do a full upgrade, reboot.
# systemctl stop cloudstack-agent
# yum -y update cloudstack-agent

## Restart the service or reboot just to make sure the host can come up by itself
## reboot
# systemctl restart cloudstack-agent
Updating the system VMs
Check your list of virtual routers under Infrastructure -> Virtual routers. Update any VMs that are marked with 'requires upgrade'. Do so by selecting the VM and clicking on the 'upgrade router to use newer template' button.
If the virtual router doesn't start up properly after performing an upgrade, make sure that the VM is running on a node with an appropriate CloudStack agent version. Virtual routers that land on a node with an older version of the agent won't start properly.
Other upgrade notes
Things to watch out for:
- Don't upgrade CloudStack packages on a server until you stop the CloudStack services. For some reason, I've had issues in the past where something with Java gets corrupted if you try to do an upgrade while the java processes are still running. This then results in some odd class loader issue which results in the service being unable to start after the upgrade.
- System VM template: I upgraded the CloudStack management server to 4.16.1 using a custom compiled RPM package. However, the management server didn't start and inspecting the logs show that it was expecting a system VM template at
/usr/share/cloudstack-management/templates/systemvm/systemvmtemplate-4.16.1-kvm.qcow2.bz2. This is easily fixed by downloading the template and restarting the management server.wget http://download.cloudstack.org/systemvm/4.16/systemvmtemplate-4.16.1-kvm.qcow2.bz2 -O /usr/share/cloudstack-management/templates/systemvm/systemvmtemplate-4.16.1-kvm.qcow2.bz2
Traefik
Using Traefik for SSL termination
With the console proxy served using SSL, we could put a reverse proxy in front of both the management UI and the console proxy service VMs with a valid certificate. This allows us to 'mask' the self-signed certificate with Traefik's ability to request for a proper certificate from Let's Encrypt.
In my test version of CloudStack, I've set up Traefik with the following configs. I updated the console proxy to use a dynamic URL by setting consoleproxy.url.domain to something like *.cloudstack-test.example.com. CloudStack's console proxy service will translate the * by the system VM's IP address (Eg. 10.1.1.1 becomes 10-1-1-1). We'll tell Traefik to reverse proxy these domains for both HTTPS and WSS on ports 443 and 8080 respectively. My dynamic traefik configs to make this happen looks like the following:
http:
  serversTransports:
    ignorecert:
      insecureSkipVerify: true

  routers:
    cloudstack:
      rule: Host(`cloudstack-test.example.com`)
      service: cloudstack-poc
      entrypoints:
        - http
      middlewares:
        - https-redirect

    cloudstack-https:
      rule: Host(`cloudstack-test.example.com`)
      service: cloudstack-poc
      entrypoints:
        - https
      tls:
        certresolver: letsencrypt

    cloudstack-pub-ip-136-159-1-100:
      rule: Host(`136-159-1-1.cloudstack-test.example.com`)
      service: 136-159-1-100
      entrypoints:
        - https
      tls:
        certresolver: letsencrypt

    cloudstack-pub-ip-136-159-1-100-ws:
      rule: Host(`136-159-1-1.cloudstack-test.example.com`)
      service: 136-159-1-100-ws
      entrypoints:
        - httpws
      tls:
        certresolver: letsencrypt

  services:
    cloudstack-poc:
      loadBalancer:
        servers:
          - url: "http://172.19.12.141:8080"

    136-159-1-100:
      loadBalancer:
        servers:
          - url: "https://136.159.1.100"
        serversTransport: ignorecert

    136-159-1-100-ws:
      loadBalancer:
        servers:
          - url: "https://136.159.1.100:8080"
        serversTransport: ignorecert

  middlewares:
    https-redirect:
      redirectscheme:
        scheme: https
And the following traefik configs:
entryPoints:
  http:
    address: ":80"
  https:
    address: ":443"
  httpws:
    address: ":8080"

certificatesResolvers:
  letsencrypt:
    acme:
      email: user@example.com
      storage: "/config/acme.json"
      httpChallenge:
        entryPoint: http
Change guest VM CPU flags
The default CPU flags that guest VMs sees are set to qemu64 compatible features. The qemu64 feature set covers a very small subset of the available features that modern CPUs have which makes the guest VM be compatible to nearly all available CPUs at the cost of reduced features. The feature flags in qemu64 are: fpu de pse tsc msr pae mce cx8 apic sep mtrr pge mca cmov pse36 clflush mmx fxsr sse sse2 ht syscall nx lm rep_good nopl xtopology cpuid tsc_known_freq pni cx16 x2apic hypervisor lahf_lm cpuid_fault pti
For virtualized workloads that require additional feature sets, you can edit the CloudStack agent to use a different guest CPU mode. Select one of:
- custom: This is the default and it defaults to the x86_qemu64 feature set defined in
/usr/share/libvirt/cpu_map/x86_qemu64.xml. You may select a different CPU map by specifyingguest.cpu.model. - host-model: Uses a CPU model compatible with your host. Most feature flags are available. Guest CPUs will identify itself as a generic CPU of that family such as
Intel Xeon Processor (Icelake)(note the lack of '(R)' after Intel and Xeon brands and no specific CPU model number). - host-passthrough: Use CPU passthrough; feature flags match exactly. Migrations only work with matching CPUs and may still fail when using this mode. Guest CPUs will identify itself as the underlying CPU in that hypervisor (such as
Intel(R) Xeon(R) Gold 5320 CPU @ 2.20GHz)
For CloudStack clusters with identical CPUs, it's recommended to use host-model. I've tried using host-passthrough on matching hosts using a Intel Xeon Silver 4316 and migrations sometimes fail and the VM requires a reset to be brought back up.
For more information, see: http://docs.cloudstack.apache.org/en/4.15.0.0/installguide/hypervisor/kvm.html#install-and-configure-the-agent
To change the CPU mode, you simply need to add the appropriate line into the agent properties file and restart the agent:
## Matching host model
# echo "guest.cpu.mode=host-model" >> /etc/cloudstack/agent/agent.properties
# systemctl restart cloudstack-agent.service

## Passthrough
# echo "guest.cpu.mode=host-passthrough" >> /etc/cloudstack/agent/agent.properties
# systemctl restart cloudstack-agent.service
Using Open vSwitch and DPDK
Getting DPDK working with Open vSwitch is relatively straight forward. You need to install the DPDK packages, configure the kernel to use hugepages and IO passthrough, enable the vfio driver on your network interfaces for DPDK support, reconfigure Open vSwitch to use the DPDK device, and enable DPDK on the CloudStack agent.
There are some existing resources that might help.
- https://www.shapeblue.com/openvswitch-with-dpdk-support-on-cloudstack/
- https://access.redhat.com/documentation/en-us/red_hat_openstack_platform/10/html/ovs-dpdk_end_to_end_troubleshooting_guide/configure_and_test_lacp_bonding_with_open_vswitch_dpdk
Install DPDK tools:
# yum -y install dpdk dpdk-tools
Reconfigure your kernel by editing /etc/default/grub. Add the following. Adjust the isolcpus depending on your CPUs available. I assigned 4 cores out of 80 vCPUs. I am also using 16 1GB huge pages. Adjust this according to how much memory your system has (and probably what performance you're seeing)
# vi /etc/default/grub
## default_hugepagesz=1GB hugepagesz=1G hugepages=16 iommu=pt intel_iommu=on isolcpus=1-19,21-39,41-59,61-79 intel_pstate=disable nosoftlockup

# grub2-mkconfig -o /boot/grub2/grub.cfg
You can also configure huge pages by sysctl (optional if you set it in the kernel cmdline)
# echo 'vm.nr_hugepages=16' > /etc/sysctl.d/hugepages.conf
# sysctl -w vm.nr_hugepages=16
Load the vfio-pci kernel module on boot
# echo vfio-pci > /etc/modules-load.d/vfio-pci.conf
Reboot the machine. When it comes back, verify that you have hugepages and vfio-pci loaded, and that IOMMU is working.
# cat /proc/cmdline | grep iommu=pt
# cat /proc/cmdline | grep intel_iommu=on
# dmesg | grep -e DMAR -e IOMMU
# grep HugePages_ /proc/meminfo
# lsmod | grep vfio-pci
Set the network interfaces you wish to use DPDK on to the vfio-pci driver. This is done using the dpdk-devbind.py script that's provided by the DPDK tools package.
# modprobe vfio-pci
# dpdk-devbind.py --bind=vfio-pci ens2f0
# dpdk-devbind.py --bind=vfio-pci ens2f1
## Verify
# dpdk-devbind.py --status

Network devices using DPDK-compatible driver
============================================
0000:31:00.0 'Ethernet Controller X710 for 10GBASE-T 15ff' drv=vfio-pci unused=i40e
0000:31:00.1 'Ethernet Controller X710 for 10GBASE-T 15ff' drv=vfio-pci unused=i40e
Enable DPDK on Open vSwitch. pmd-cpu-mask defines what cores are used for data path packet processing. The dpdk-lcore-mask defines cores that non-datapath OVS-DPDK threads such as handler and revalidator threads run. These two masks should not overlap. For more information on these parameters, see: https://developers.redhat.com/blog/2017/06/28/ovs-dpdk-parameters-dealing-with-multi-numa.
# ovs-vsctl --no-wait set Open_vSwitch . other_config:dpdk-init=true
# ovs-vsctl --no-wait set Open_vSwitch . other_config:dpdk-lcore-mask=0x00000001
# ovs-vsctl --no-wait set Open_vSwitch . other_config:pmd-cpu-mask=0x17c0017c
# ovs-vsctl --no-wait set Open_vSwitch . other_config:dpdk-socket-mem="1024"

## Verify
# ovs-vsctl get Open_vSwitch . dpdk_initialized
# ovs-vsctl get Open_vSwitch . dpdk_version
If Open vSwitch is already configured to use these interfaces by name, you will just need to change the interface type to dpdk and set its PCI address.
# ovs-vsctl set interface ens2f0 type=dpdk
# ovs-vsctl set interface ens2f0 options:dpdk-devargs=0000:31:00.0
# ovs-vsctl set interface ens2f1 type=dpdk
# ovs-vsctl set interface ens2f1 options:dpdk-devargs=0000:31:00.1
The bridge that these interfaces are connected to must also have its datapath_type updated:
# ovs-vsctl set bridge nic0 datapath_type=netdev
Restart Open vSwitch for these to apply properly and confirm that it's working
# systemctl restart openvswitch
# ovs-vsctl show
...
        Port bond0
            Interface ens2f1
                type: dpdk
                options: {dpdk-devargs="0000:31:00.1"}
            Interface ens2f0
                type: dpdk
                options: {dpdk-devargs="0000:31:00.0"}
Update the CloudStack agent so that this host has the DPDK capability. Edit /etc/cloudstack/agent/agent.properties. Note that the keyword is openvswitch.dpdk.enabled (enabled ending with -ed). The example from ShapeBlue's blog post is wrong.
network.bridge.type=openvswitch
libvirt.vif.driver=com.cloud.hypervisor.kvm.resource.OvsVifDriver
openvswitch.dpdk.enabled=true
openvswitch.dpdk.ovs.path=/var/run/openvswitch/
Restart the CloudStack agent for this capability to be visible by the management server. You should be able to call list hosts filter=capabilities,name and have the host list dpdk as a capability. Eg:
(localcloud) 🐱 > list hosts filter=capabilities,name
count = 22
host:
+-------------------+----------+
|   CAPABILITIES    |   NAME   |
+-------------------+----------+
| hvm,snapshot,dpdk | cs9      |
| hvm,snapshot,dpdk | cs10     |
| hvm,snapshot,dpdk | cs11     |
If you don't see this, double check your agent configs and restart it again.
For VMs to take advantage of DPDK, you must either set extraconfig on the virtual machine or create a new compute service offering. Extraconfig might get overwritten whenever the VM is updated, so it's not a reliable solution. Extraconfig is a URL encoded config and you cannot use single quotes in it or else you will break the VM deployment. Eg:
(localcloud) 🐱 > update virtualmachine extraconfig=dpdk-hugepages:%0A%3CmemoryBacking%3E%0A%20%20%20%3Chugepages%3E%0A%20%20%20%20%3C/hugepages%3E%0A%3C/memoryBacking%3E%0A%0Adpdk-numa:%0A%3Ccpu%20mode=%22host-passthrough%22%3E%0A%20%20%20%3Cnuma%3E%0A%20%20%20%20%20%20%20%3Ccell%20id=%220%22%20cpus=%220%22%20memory=%229437184%22%20unit=%22KiB%22%20memAccess=%22shared%22/%3E%0A%20%20%20%3C/numa%3E%0A%3C/cpu%3E%0A%0Adpdk-interface-queue:%0A%3Cdriver%20name=%22vhost%22%20queues=%22128%22/%3E id=af64cc80-a4e4-4c17-9c7d-c34ed234dc6a
virtualmachine = map[account:RCS affinitygroup:[] cpunumber:2 cpuspeed:1000 cpuused:5.88% created:2022-05-03T13:16:02-0600 details:map[Message.ReservedCapacityFreed.Flag:false dpdk-hugepages:a extraconfig-dpdk-hugepages:<memoryBacking>
Troubleshooting
2022-05-05T22:35:28.312Z|281704|netdev_dpdk|INFO|vHost Device '/var/run/openvswitch/csdpdk-1' connection has been destroyed
2022-05-05T22:35:28.312Z|281705|netdev_dpdk|INFO|vHost Device '/var/run/openvswitch/csdpdk-1' connection has been destroyed
2022-05-05T22:35:28.313Z|281706|netdev_dpdk|INFO|vHost Device '/var/run/openvswitch/csdpdk-1' connection has been destroyed
2022-05-05T22:35:28.313Z|281707|netdev_dpdk|INFO|vHost Device '/var/run/openvswitch/csdpdk-1' connection has been destroyed
2022-05-05T22:35:28.313Z|281708|netdev_dpdk|INFO|vHost Device '/var/run/openvswitch/csdpdk-1' connection has been destroyed
Check the agent logs for issues from qemu. I had defined an invalid property which prevented the VM from starting.
[root@cs10 agent]# grep qemu agent.log
org.libvirt.LibvirtException: internal error: process exited while connecting to monitor: 2022-05-05T22:35:52.060450Z qemu-kvm: -netdev vhost-user,chardev=charnet0,queues=256,id=hostnet0: you are asking more queues than supported: 128
2022-05-05T22:35:52.060633Z qemu-kvm: -netdev vhost-user,chardev=charnet0,queues=256,id=hostnet0: you are asking more queues than supported: 128
2022-05-05T22:35:52.060817Z qemu-kvm: -netdev vhost-user,chardev=charnet0,queues=256,id=hostnet0: you are asking more queues than supported: 128
Tools
CloudMonkey
Get started:
- Download from: https://github.com/apache/cloudstack-cloudmonkey/releases/tag/6.1.0
- Documentation at: https://cwiki.apache.org/confluence/display/CLOUDSTACK/CloudStack+cloudmonkey+CLI
When you first run CloudMonkey, you will need to set the CloudStack instance URL and credentials and then run sync.
$ cmk
> set url http://172.19.12.141:8080/client/api
> set username admin
> set password password
> sync
The settings are then saved to ~/.cmk/config.
The sync command fetches all the available API calls that your account can use. Once that is done, you can then use tab completion while in the CloudMonkey CLI.
Cheat sheet
| What | Command |
|---|---|
| Change output format | set display table|json
|
| Create compute offering | create serviceoffering name=rcs.c2 displaytext=Medium cpunumber=2 cpuspeed=750 memory=2048 storagetype=shared provisioningtype=thin offerha=false limitcpuuse=false isvolatile=false issystem=false deploymentplanner=UserDispersingPlanner cachemode=none customized=false
|
| Add a new host | add host clusterid=XX podid=XX zoneid=XX hypervisor=KVM password=**** username=root url=http://bm01
|
Automate zone deployments
There is an example script on how to automate a basic zone deployment at: https://github.com/apache/cloudstack-cloudmonkey/wiki/Usage
Terraform
The Terraform CloudStack provide works for the most part. However, for CloudStack 4.16, you'll need to recompile it from scratch because the distributed binaries don't work properly (resulting in deployments hanging indefinitely). To build the Terraform provider, I will use Docker:
# git clone https://github.com/apache/cloudstack-terraform-provider.git
# cd cloudstack-terraform-provide
# git clone https://github.com/tetra12/cloudstack-go.git
# cat <<EOF >> go.mod
replace github.com/apache/cloudstack-go/v2 => ./cloudstack-go
exclude github.com/apache/cloudstack-go/v2 v2.11.0
EOF
# docker run --rm -ti -v /home/me/cloudstack-terraform-provider/:/build golang bash
> cd /build
> go build
Copy the resulting binary to your terraform plugins path. Because I ran terraform init, it placed it in my terraform directory under .terraform/providers/registry.terraform.io/cloudstack/cloudstack/0.4.0/linux_amd64/terraform-provider-cloudstack_v0.4.0. Edit the metadata file in the same directory as the provider executable and remove the file hash so that terraform runs the provider.
See also: Terraform#CloudStack
Packer
The Packer CloudStack provider also works for the most part, but is limited in that it cannot enter keyboard inputs. Any OS deployments will require some sort of manual inputs or require that the ISO media you use is completely automated. I also had to compile the provider manually since the default plugin that's fetched by packer doesn't quite work due to API changes.
See also: Packer#CloudStack
Troubleshooting
When you run into issues, check the logs in /var/log/cloudstack/. There's typically a stacktrace which gets generated whenever you encounter an error.
Whenever I try creating a shared network in an advanced zone that is using OVS, the step fails with: "Unable to convert network offering with specified id to network profile".
Stack trace shows that the OVS guest network guru isn't able at designing the network because the zone isn't capable of handling this network offering.
2021-09-28 16:36:26,416 DEBUG [c.c.a.ApiServer] (qtp1816147548-400:ctx-291672d1 ctx-3f19296a) (logid:83c45c2a) CIDRs from which account 'Acct[76a1585d-1bf6-11ec-a3c5-8f3e88f01ab1-admin]' is allowed to perform API calls: 0.0.0.0/0,::/0
2021-09-28 16:36:26,439 DEBUG [c.c.u.AccountManagerImpl] (qtp1816147548-400:ctx-291672d1 ctx-3f19296a) (logid:83c45c2a) Access granted to Acct[76a1585d-1bf6-11ec-a3c5-8f3e88f01ab1-admin] to [Network Offering [7-Guest-DefaultSharedNetworkOffering] by AffinityGroupAccessChecker
2021-09-28 16:36:26,517 DEBUG [c.c.n.g.BigSwitchBcfGuestNetworkGuru] (qtp1816147548-400:ctx-291672d1 ctx-3f19296a) (logid:83c45c2a) Refusing to design this network, the physical isolation type is not BCF_SEGMENT
2021-09-28 16:36:26,521 DEBUG [o.a.c.n.c.m.ContrailGuru] (qtp1816147548-400:ctx-291672d1 ctx-3f19296a) (logid:83c45c2a) Refusing to design this network
2021-09-28 16:36:26,524 DEBUG [c.c.n.g.NiciraNvpGuestNetworkGuru] (qtp1816147548-400:ctx-291672d1 ctx-3f19296a) (logid:83c45c2a) Refusing to design this network
2021-09-28 16:36:26,527 DEBUG [o.a.c.n.o.OpendaylightGuestNetworkGuru] (qtp1816147548-400:ctx-291672d1 ctx-3f19296a) (logid:83c45c2a) Refusing to design this network
2021-09-28 16:36:26,530 DEBUG [c.c.n.g.OvsGuestNetworkGuru] (qtp1816147548-400:ctx-291672d1 ctx-3f19296a) (logid:83c45c2a) Refusing to design this network
2021-09-28 16:36:26,536 DEBUG [c.c.n.g.DirectNetworkGuru] (qtp1816147548-400:ctx-291672d1 ctx-3f19296a) (logid:83c45c2a) GRE: VLAN
2021-09-28 16:36:26,536 DEBUG [c.c.n.g.DirectNetworkGuru] (qtp1816147548-400:ctx-291672d1 ctx-3f19296a) (logid:83c45c2a) GRE: VXLAN
2021-09-28 16:36:26,536 INFO  [c.c.n.g.DirectNetworkGuru] (qtp1816147548-400:ctx-291672d1 ctx-3f19296a) (logid:83c45c2a) Refusing to design this network
2021-09-28 16:36:26,539 INFO  [c.c.n.g.DirectNetworkGuru] (qtp1816147548-400:ctx-291672d1 ctx-3f19296a) (logid:83c45c2a) Refusing to design this network
2021-09-28 16:36:26,543 DEBUG [o.a.c.n.g.SspGuestNetworkGuru] (qtp1816147548-400:ctx-291672d1 ctx-3f19296a) (logid:83c45c2a) SSP not configured to be active
2021-09-28 16:36:26,546 DEBUG [c.c.n.g.BrocadeVcsGuestNetworkGuru] (qtp1816147548-400:ctx-291672d1 ctx-3f19296a) (logid:83c45c2a) Refusing to design this network
2021-09-28 16:36:26,549 DEBUG [o.a.c.e.o.NetworkOrchestrator] (qtp1816147548-400:ctx-291672d1 ctx-3f19296a) (logid:83c45c2a) Releasing lock for Acct[76a0531f-1bf6-11ec-a3c5-8f3e88f01ab1-system]
2021-09-28 16:36:26,624 DEBUG [c.c.u.d.T.Transaction] (qtp1816147548-400:ctx-291672d1 ctx-3f19296a) (logid:83c45c2a) Rolling back the transaction: Time = 172 Name =  qtp1816147548-400; called by -TransactionLegacy.rollback:888-TransactionLegacy.removeUpTo:831-TransactionLegacy.close:655-Transaction.execute:38-Transaction.execute:47-NetworkOrches
trator.createGuestNetwork:2572-NetworkOrchestrator.createGuestNetwork:2327-NetworkServiceImpl$4.doInTransaction:1502-NetworkServiceImpl$4.doInTransaction:1450-Transaction.execute:40-NetworkServiceImpl.commitNetwork:1450-NetworkServiceImpl.createGuestNetwork:1366
2021-09-28 16:36:26,667 ERROR [c.c.a.ApiServer] (qtp1816147548-400:ctx-291672d1 ctx-3f19296a) (logid:83c45c2a) unhandled exception executing api command: [Ljava.lang.String;@69a8823d
com.cloud.utils.exception.CloudRuntimeException: Unable to convert network offering with specified id to network profile
        at org.apache.cloudstack.engine.orchestration.NetworkOrchestrator.setupNetwork(NetworkOrchestrator.java:739)
        at org.apache.cloudstack.engine.orchestration.NetworkOrchestrator$10.doInTransaction(NetworkOrchestrator.java:2634)
        at org.apache.cloudstack.engine.orchestration.NetworkOrchestrator$10.doInTransaction(NetworkOrchestrator.java:2572)
        at com.cloud.utils.db.Transaction$2.doInTransaction(Transaction.java:50)
        at com.cloud.utils.db.Transaction.execute(Transaction.java:40)
        at com.cloud.utils.db.Transaction.execute(Transaction.java:47)
...
Possible answer
The guest network was set up with GRE isolation. This however isn't supported with KVM as the hypervisor (see this presentation). After re-creating the zone with the guest physical network set up with just VLAN isolation, I was able to create a regular shared guest network that all tenants within the zone can see and use.
To make the shared network SNAT out, I created another shared network offering that also has SourceNat and StaticNat.
$ cmk list serviceofferings issystem=true name='System Offering For Software Router'
$ cmk create networkoffering \
name=SharedNetworkOfferingWithSourceNatService displaytext="Shared Network Offering with Source NAT Service" traffictype=GUEST guestiptype=shared conservemode=true specifyvlan=true specifyipranges=true \
serviceofferingid=307b14d8-afd1-43ea-948c-ffe882cd5926 \
supportedservices=Dhcp,Dns,Firewall,SourceNat,StaticNat,PortForwarding \
serviceProviderList[0].service=Dhcp serviceProviderList[0].provider=VirtualRouter \
serviceProviderList[1].service=Dns serviceProviderList[1].provider=VirtualRouter \
serviceProviderList[2].service=Firewall serviceProviderList[2].provider=VirtualRouter \
serviceProviderList[3].service=SourceNat serviceProviderList[3].provider=VirtualRouter \
serviceProviderList[4].service=StaticNat serviceProviderList[4].provider=VirtualRouter \
serviceProviderList[5].service=PortForwarding serviceProviderList[5].provider=VirtualRouter \
servicecapabilitylist[0].service=SourceNat servicecapabilitylist[0].capabilitytype=SupportedSourceNatTypes servicecapabilitylist[0].capabilityvalue=peraccount
Using this network offering, I was able to create a shared network in the advanced networking zone that has a NAT service which is visible to all accounts. The only issue with this approach is that there isn't a way to create a port forwarding for a specific VM because the account that owns this network is 'system'.
Libvirtd can't start due to expired certificate
For some reason, the host stopped renewing agent certs with the management server. As a result, libvirtd will not restart. I only noticed this after rebooting an affected node after migrating all the VMs off the system.
# libvirtd -l
2023-11-30 18:16:25.116+0000: 39448: info : libvirt version: 8.0.0, package: 22.module+el8.9.0+1405+b6048078 (infrastructure@rockylinux.org, 2023-07-31-18:01:38, )
2023-11-30 18:16:25.116+0000: 39448: info : hostname: cs1
2023-11-30 18:16:25.116+0000: 39448: error : virNetTLSContextCheckCertTimes:142 : The server certificate /etc/pki/libvirt/servercert.pem has expired
Note that the certficate file /etc/pki/libvirt/servercert.pem symlinks to /etc/cloudstack/agent/cloud.crt. The certificates and private keys under /etc/cloudstack/agent/cloud* are generated by the CloudStack management server and then sent to and saved by the agent[1].
Since the node is already out of service, the easiest fix here is to re-add this KVM bare metal host back into CloudStack again.
Open-ended questions
Compute offerings with 'unlimited' CPU cycles?
Compute offerings require a MHz value assigned. Why is this? Can we just assign a VM entire cores?
- If you read the docs, CPU (in MHz) only has an effect if CPU cap is selected. In all other cases, the value here is something akin to 'cpu shares'.
- if you put in a huge number like 9999, deployment would fail though.
How to implement showback?
Is there a way to implement showback based on resources consumed by account?
Monitoring resources?
Is there a way to monitor resource usage by account, node? Any good way to push VMs into a CMDB like ServiceNow?
NetApp integration?
Is it possible to do guest VM snapshots by leveraging NetApp?
Backups?
The only backup plugins that are available are 'dummy' which does nothing and 'veeam' which only supports VMware + Veeam. If you're using KVM, there doesn't seem to be any way to easily backup/restore VMs.
