Thingino
Thingino is an open-source firmware for Ingenic based IP cameras. This is a good alternative firmware for the Wyze Cam (v2, v3, but not the v4) as it has RTSP support with an up-to-date kernel/OS.
Installation
Josh at WL Tech Blog has made Thingino installers for all the supported cameras available from his GitHub repo:
Simply find the installer for your camera and follow the instructions provided.
Installation using Cloner
If you 'brick' your T31 based camera through a bad update, you can use the Ingenic USB Cloner tool to reflash the firmware. More information at https://github.com/themactep/thingino-firmware/wiki/Ingenic-USB-Cloner
In short, the cloner tool can re-flash the flash memory without needing the device to boot into an operating system. This works only if you put the T31 SoC into USB-boot mode (think of it like DFU mode for IOS) which happens if the flash memory isn't bootable. The simplest way to achive this is to open the camera and to short out the flash memory chip on power up to render it unreadable by the SoC.
Steps to use cloner:
- Download cloner for Windows at: https://github.com/gtxaspec/ingenic-cloner-profiles/releases/download/legacy/cloner-2.5.43-windows_thingino.7z
- Install the cloner app and the USB driver.
- Open the camera and locate the flash chip. This is typically an 8 pin chip labelled something like 25Q64 or 25Q128. Read the thingino-firmware wiki linked above for pictures. You need to short out pins 5+6 (pins on opposite corner of where there is an embossed dot on the chip)
- Plug the camera to your PC while shorting the pins and then release the short.
- If this is working, you should see a new device in device manager called 'usb cloner device'
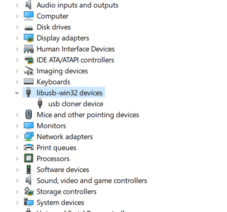
Ingenic usb cloner device - Run the cloner utility.
- Click 'Config'. Set platform to T, t31x. Select Board: t31x_sfc_nor_writer_full.cfg,
- Click the Policy tab, select full_image, SFC_NOR at offset 0x0 with the full thingino firmware file as the attribute. Save this policy as something new
- Click Start. The cloner program is now listening for a new cloner device to become available.
- Repeat step #3-4 or trigger the device to reappear (such as if you attach it to a VM and then detach it)
- The cloner program should automatically erase and reprogram the camera once it becomes available. It will reboot the camera automatically.

Wyze cam v3
Installation on the Wyze Cam v3 is simple: You simply need to copy a few files to your SD card and then reboot the camera. You don't even need to touch it if you already have wz_mini_hacks installed as you just need to copy the files via SSH and reboot.
- Download the latest installer files from https://github.com/wltechblog/thingino-installers/tree/main/wyze-cam-3
- Extract the files and then upload it to the SD card. if you're using wz_mini_hacks with SSH enabled, you can just copy it via SSH:
$ for i in factory_t31_ZMC6tiIDQN thingino-wyze_cam3_t31al_gc2053_atbm6031.bin thingino-wyze_cam3_t31x_gc2053_atbm6031.bin thingino-wyze_cam3_t31x_gc2053_rtl8189ftv.bin ; do cat "$i" | ssh root@wyze-camera "cat - > /media/mmc/$i" ; done
- Reboot the camera and wait 2-3 minutes.
- You should see a wireless access point show up once this is done named "THINGINO-XXXX". Connect to it and then go to http://172.16.0.1/ to complete the setup. After you enter your password/wifi settings, you will see the MAC address of the device.
Frigate integration
Getting Thingino and Frigate with nvidia hardware acceleration seems to be a little tempermental when configured with a specific combination of configuration settings that leads to the detection and recording processes to eventually misbehave and crash. When this misbehavior happens, ffmpeg uses 100% GPU and rapidly eats up as much system memory as it can get before OOM kills it. While this happens, the preview shows corrupt frames like this:

A few things that I had to do to make it work:
- If you use the sub stream, you shouldn't use hwaccel_args : preset-nvidia or else ffmpeg goes off the rails and then crashes
- If you want to use hwaccel_args: preset-nvidia, then don't use the sub stream as an input. You can still use it as a live stream.
This seems to work for me:
garage:
    ffmpeg:
      hwaccel_args: preset-nvidia
      output_args:
        record: preset-record-generic-audio-aac
      inputs:
        - path: rtsp://127.0.0.1:8554/wyze-garage?timeout=30
          input_args: preset-rtsp-restream
          roles:
            - record
            - detect
            - audio
    live:
      stream_name: wyze-garage_sub
go2rtc:
  streams:
    wyze-garage:
       - rtsp://thingino:thingino@ip:554/ch0#timeout=30
    wyze-garage_sub:
       - rtsp://thingino:thingino@ip:554/ch1#timeout=30

  webrtc:
    candidates:
      - 10.1.2.30:8555
      - stun:8555
Support ASIX AX88179
I bought a cheap USB 3.0 gigabit adapter from Amazon "TP-Link USB to Ethernet Adapter (UE306)" for CAD$14. This comes with a AX88179 chip which isn't supported by Thingino out of the box. In order to make this work, you will need to rebuild the firmware and enable this feature.
The Thingino build is quite straight forward. Follow the instructions outlined at https://github.com/themactep/thingino-firmware/wiki/Building-from-sources.
In summary, the steps are:
- On an Ubuntu based system, install the dependencies:
apt install bison cmake flex gawk libncurses u-boot-tools git bash dialog. Ensure that you have at least 7 GB of storage available to store the repo and the output directory. The build script puts everything into$HOME/output, so if you don't want that (e.g. if your home directory is on a slow NFS server), symlink it somewhere before you start. - Clone the git repo:
git clone --depth=1 --recurse-submodules --shallow-submodules https://github.com/themactep/thingino-firmware - Go into the firmware and then run the
user-menu.shscript. - Next, enable the ASIX AX88179 module.
- Select "
Main Menu", - On the '
Thingino Buildroot' menu, select 'menuconfig', then 'menuconfig', then select your device (wyze_cam3_t31x_gc2053_rtl8189ftv), - On the '
Buildroot xxxxxx Configuration' menu, you can select settings specific to this build. Selet 'External options',Thingino Firmware,USB Networking options, select 'ASIX AX88179_178A USB' to enable it. - Exit out until you see the main '
Thingino Buildroot' menu again and then select 'make fast' to compile.
- Select "
- Your firmware should be placed in your home directory
~/outputdirectory. You can do a OTA update or copy the .bin file and manually flash it through the web interface. If you somehow chose something bad and the device boot-loops... you'll have to use the cloner program to recover.
If everything works out, you should see eth0 after the device comes online. Enable eth0 in the web interface and then reboot.