Pi-hole
Pi-hole is a light weight application that configures a DNS and DHCP server for the purpose of blocking advertisements. It comes with an optional control panel written in PHP. As the name suggests, it is designed to run on a Raspberry Pi, although it can also be installed on anything that runs a supported version of Linux.
Running Pi-hole on the original Raspberry Pi 1 works, though the web interface might be somewhat sluggish. I am using Pi-hole as an alternative to OpenWRT with the Adblock package. One drawback with Pi-hole compared to OpenWRT is that the system needs a full blown Linux distro to function and the installation size is several orders of magnitude larger (1.7GB vs. 16MB). The initial boot time is definitely longer and the use of SQLite might cause higher wear on the SD card.
Installation
Pi-hole can be installed on a clean install of Raspbian (Raspberry Pi OS), Ubuntu, Debian, Fedora, or CentOS. The installation process can be started by running their install script with alternative methods listed on their installation page. Pi-hole does not work with SELinux enabled.
# curl -sSL https://install.pi-hole.net | bash
Follow the installation steps and make a note of the admin password that is generated. If you did not see the admin password or if you've forgotten it, you can reset it with pihole -a -p.
Pi-hole does not touch your firewall. If you have a firewall enabled, you will need to allow Pi-hole ports through. Consult the prerequisite page for information.
If the web interface was installed, it should be available at the Pi-hole's IP address or at http://pi.hole/ once you start using it as your DNS server.
Using IP Blocking Mode
IP Blocking mode is required (over the default null blocking mode) if you wish to have a block page visible for blacklisted domains. Limitations with this mode include requiring an additional set of firewall rules to stop HTTPS connections immediately (to avoid certificate errors and slow connection timeouts) and extra overhead with connections being made to blocked hosts by your browser.
To use IP blocking mode, configure the firewall with the following rules:
# iptables -A INPUT -p tcp --dport 443 -j REJECT --reject-with tcp-reset
# iptables -A INPUT -p udp --dport 443 -j REJECT --reject-with icmp-port-unreachable
# ip6tables -A INPUT -p tcp --dport 443 -j REJECT --reject-with tcp-reset
# ip6tables -A INPUT -p udp --dport 443 -j REJECT --reject-with icmp6-port-unreachable
Then, edit /etc/pihole/pihole-FTL.conf and set BLOCKINGMODE=IP. If you are using IPv6 on your network, ensure that the IPV6_ADDRESS value in setupVars.conf is correct, otherwise connections made via IPv6 will need to timeout causing pages to take longer to load. Apply your changes by restarting pihole-FTL or with killall -SIGHUP pihole-FTL. If this works correctly, going to a blacklisted server will show a blocked page and going to the secured version of the blacklisted host will immediately result in a connection refused error.
To make these IPtable rules persistent, install the iptables-persistent package and save the rules with the following commands.
# apt-get install iptables-persistent
# iptables-save > /etc/iptables/rules.v4
# ip6tables-save > /etc/iptables/rules.v6
Administration
Keep in mind that Pi-hole FTL is Pi-hole's altered version of dnsmasq. The daemon uses the same configs as dnsmasq and extra configs can be placed in /etc/dnsmasq.d/.
TFTP / PXE Boot Support
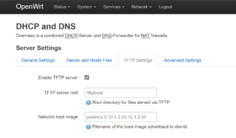
Unlike in OpenWRT where you can define the TFTP settings for dnsmasq directly in Luci, with Pi-hole, you will need to define the dnsmasq DHCP options configuration in a configuration file manually.
Create a dnsmasq configuration file at /etc/dnsmasq.d/02-tftp.conf with the following lines to define the next server and next file. These are the same values that you would have entered in OpenWRT via Luci. Ensure that the TFTP root exists and contains your PXE boot files.
# Defined within /etc/dnsmasq.d/02-tftp.conf
enable-tftp
tftp-root=/tftpboot
dhcp-boot=pxelinux.0,10.1.2.54,10.1.2.54
Restart pihole-FTL with systemctl restart pihole-FTL to apply.
Updating
Updating Pi-hole is as simple as running:
# pihole -up
Troubleshooting
Pi-hole is blocking DNS requests for specific hosts
If a DNS lookup from a particular host is failing with a REFUSED answer, you may have hit the Pi-Hole rate limiter which was added sometime in early 2021.
The rate limit can be defined in /etc/pihole/pihole-FTL.conf using the RATE_LIMIT parameter. The default rate limit is 1000 queries per 60 seconds.
To raise the rate limit, specify the value as requests over time period. For example, 500 queries per hour would be:
RATE_LIMIT=500/3600
To disable rate limit all together, add:
RATE_LIMIT=0/0
Pi-hole is blocking itself when accessing pihole URL
When navigating to http://pihole/, you may see an error "Access to the following website has been denied:" and that "This is primarily due to being flagged as: Not found on any Blacklist". This is a red herring since lighttpd will serve the website blocked page for any domains it does not recognize.
You can still navigate to http://pihole/admin to view the dashboard.
/var/log filling up
If you /var/log is small such as the case when it is mounted as a ramdisk to minimize writes to the SD card on a Raspberry Pi, you may want to tweak the /etc/pihole/logrotate file and reduce the rotation amount to 1 or 0. All DNS queries captured by Pi-hole FTL will be logged in /var/log/pihole.log which can grow quite large when there are many DNS queries.
/etc/pihole/pihole-FTL.db is growing really large
On systems with small storage spaces, the pihole-FTL.db SQLite database file may become too big. You may try to reduce the size by:
- Adding
MAXDBDAYS=60to/etc/pihole/pihole-FTL.confto limit the data retention to 60 days (adjust as desired) - Edit the database manually by stopping pihole-FTL and then opening the database file with
sqlite3.
# sqlite3 /etc/pihole/pihole-FTL.db
sqlite> SELECT count(*) FROM queries;
13092920
sqlite> DELETE FROM queries WHERE timestamp <= strftime('%s', datetime('now', '-60 day'));
sqlite> VACUUM;
See Also
- Project Repository - https://github.com/pi-hole/pi-hole
- Official Documentation - https://docs.pi-hole.net
- Firewall Rule Configuration - https://docs.pi-hole.net/guides/vpn/firewall/

