Z/Linux Emulation with Hercules
Installation
The guide I am using is available at http://www.josefsipek.net/docs/s390-linux/hercules-s390.html
Requirements
Install hercules, either from a package manager or from source.
Create the directory where z/linux will reside. I will be putting it in my home directory.
cd ~
mkdir zlinux
cd zlinux
mkdir rdr dasd prt
Images
Download the images from http://ftp.debian.org/debian/dists/stable/main/installer-s390/current/ into rdr/.
Create a configuration file at ~/zlinux/s390.cnf with:
CPUSERIAL 000069        # CPU serial number
CPUMODEL  9672          # CPU model number
MAINSIZE  256           # Main storage size in megabytes
XPNDSIZE  0             # Expanded storage size in megabytes
CNSLPORT  3270          # TCP port number to which consoles connect
NUMCPU    2             # Number of CPUs
LOADPARM  0120....      # IPL parameter
OSTAILOR  LINUX         # OS tailoring
PANRATE   SLOW          # Panel refresh rate (SLOW, FAST)
ARCHMODE  ESAME         # Architecture mode ESA/390 or ESAME

# .-----------------------Device number
# |     .-----------------Device type
# |     |       .---------File name and parameters
# |     |       |
# V     V       V
#---    ----    --------------------

# console
001F    3270

# terminal
0009    3215

# reader
000C    3505    ./rdr/kernel.debian ./rdr/parmfile.debian ./rdr/initrd.debian autopad eof

# printer
000E    1403    ./prt/print00e.txt crlf

# dasd
0120    3390    ./dasd/3390.LINUX.0120
0121    3390    ./dasd/3390.LINUX.0121

# tape
0581    3420

# network                               s390     realbox
0A00,0A01  CTCI -n /dev/net/tun -t 1500 10.1.10.2 10.1.10.1
Create the disks
cd ~/zlinux/dasd
dasdinit -lfs -linux 3390.LINUX.0120 3390-3 LIN120  # for /
dasdinit -lfs -linux 3390.LINUX.0121 3390-3 LIN121  # for /home
Networking
Ensure your tun0 interface can talk out. We will make a NAT using IPTables:
iptables -t nat -A POSTROUTING -o eth0 -s 10.1.10.0/24 -j MASQUERADE
iptables -A FORWARD -s 10.1.10.0/24 -j ACCEPT
iptables -A FORWARD -d 10.1.10.0/24 -j ACCEPT
echo 1 > /proc/sys/net/ipv4/ip_forward
echo 1 > /proc/sys/net/ipv4/conf/all/proxy_arp
Starting the Installation
Start hercules as root
hercules -f s390.cnf
ipl c
Configure the network device
----------------------------

Please choose the type of your primary network interface that you will need for
installing the Debian system (via NFS or HTTP). Only the listed devices are
supported.
Network device type:
  1. ctc: Channel to Channel (CTC) or ESCON connection
  2. qeth: OSA-Express in QDIO mode / HiperSockets
  3. iucv: Inter-User Communication Vehicle - available for VM guests only
Prompt: '?' for help>
Command ==> .1
The following device numbers might belong to CTC or ESCON connections.
CTC read device:
  1. 0.0.0a00      2. 0.0.0a01
Prompt: '?' for help>
Command ==> .1
The following device numbers might belong to CTC or ESCON connections.
CTC write device:
  1. 0.0.0a00      2. 0.0.0a01
Prompt: '?' for help>
Command ==> .2
Protocol for this connection:
  1. S/390 (0)  *!  2. Linux (1)      3. OS/390 (3)
Prompt: '?' for help, default=1>
Command ==> .1
Configure a network using static addressing
-------------------------------------------

The IP address is unique to your computer and consists of four numbers
separated by periods.  If you don't know what to use here, consult your network
administrator.
IP address:
Prompt: '?' for help>
Command ==> .10.1.10.2
The point-to-point address is used to determine the other endpoint of the point
to point network.  Consult your network administrator if you do not know the
value.  The point-to-point address should be entered as four numbers separated
by periods.
Point-to-point address:
Prompt: '?' for help>
Command ==> .10.1.10.1
The name servers are used to look up host names on the network. Please enter
the IP addresses (not host names) of up to 3 name servers, separated by spaces.
Do not use commas. The first name server in the list will be the first to be
queried. If you don't want to use any name server, just leave this field blank.
Name server addresses:
Prompt: '?' for help, default=10.1.10.1>
Command ==> .10.1.1.8
Please enter the hostname for this system.

The hostname is a single word that identifies your system to the network. If
you don't know what your hostname should be, consult your network
administrator. If you are setting up your own home network, you can make
something up here.
Hostname:
Prompt: '?' for help, default=debian>
Command ==> .zlinux
Command ==> The domain name is the part of your Internet address to the right of your host
name.  It is often something that ends in .com, .net, .edu, or .org.  If you
are setting up a home network, you can make something up, but make sure you use
the same domain name on all your computers.
Domain name:
Prompt: '?' for help>
Command ==> .home.steamr.com
Generating SSH host key

Continue installation remotely using SSH
----------------------------------------

You need to set a password for remote access to the Debian installer. A
malicious or unqualified user with access to the installer can have disastrous
results, so you should take care to choose a password that is not easy to
guess. It should not be a word found in the dictionary, or a word that could be
easily associated with you, like your middle name.

This password is used only by the Debian installer, and will be discarded once
you finish the installation.
Remote installation password:
Command ==> .password
Please enter the same remote installation password again to verify that you
have typed it correctly.
Re-enter password to verify:
Command ==> .password
Start SSH

To continue the installation, please use an SSH client to connect to the IP
address 10.1.10.2 and log in as the "installer" user. For example:

   ssh installer@10.1.10.2

The fingerprint of this SSH server's host key is:
91:99:19:9f:5c:03:1e:74:56:48:b0:e4:4b:a3:3a:c4

Please check this carefully against the fingerprint reported by your SSH
client.
 Press enter to continue!
Make sure Networking Works
Now that the installer is ready, we need to set up the networking.
ip a
if you don't see an IP on your tun0 device, you will need to define it manually.
ifconfig tun0 10.1.10.1
route add 10.1.10.2 gw 10.1.10.1
Once that's all set up, you should be able to SSH to the installer at installer@10.1.10.2
Install Debian
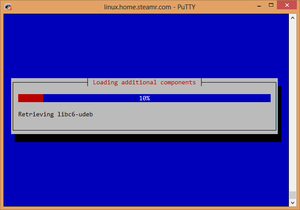
SSH to the IP, and you should begin the installation without issue. If you can't download the release data for any reason, try to SSH to the installer again and spawn a shell. From there, you can troubleshoot any networking issues you might have. For me, I ran into an issue with DNS not working due to it being on an unknown subnet.
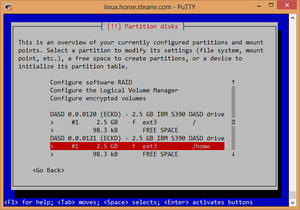
You should go through the installation steps as you would normally would with a debian install. Eventually, you will hit a stage named " Configure direct access storage devices (DASD)". You will need to put / in DASD 0.0.0120 and /home in DASD 0.0.0.121. You do not need to format the disks.
Everything afterwards should be quite straight forward.
Stopping / Starting the VM
You can poweroff or shutdown the guest like you would usually.
To boot the VM, run:
lpc 120
which will boot from your /root partition.

