Node-RED
Node-RED is a web-based flow-based development tool for visual programming APIs, hardware devices, and online services.
It was originally developed by IBM’s Emerging Technology Services team and was made open source under the Apache License 2.0 in 2016.
Installation
The simplest way to get started is to use the Node-RED docker image. I use the following docker-compose.yml configuration with docker-compose to get started. Included is a MQTT broker which I expose on the docker host on port 1883.
version: '3.3'

services:

  nodered:
    image: nodered/node-red-docker:latest
    labels:
      - "traefik.enable=true"
      - "traefik.port=1880"
      - "traefik.docker.network=traefik"
      - "traefik.frontend.rule=Host:nodered.home.steamr.com"
      - "traefik.frontend.redirect.entryPoint=https"
      - "traefik.frontend.auth.forward.address=http://auth/index.php"
    # environment:
    networks:
      - traefik
      - mqtt-net
    expose:
      - "1880"
    restart: always
    volumes:
      - /var/volumes/nodered/data:/data

  broker:
    image: eclipse-mosquitto
    networks:
      - mqtt-net
    expose:
      - "1883"
    restart: always

networks:
  mqtt-net:
  traefik:
    external:
      name: traefik
Crash Course
A flow defines the 'flow' of events that will occur when it is triggered. There are 'input' and 'output' nodes that can be dragged in from the left hand toolbox. Nodes can then be connected together by dragging a line between one node to another. After drawing your nodes and connecting them into a flow, click on the red 'Deploy' button on the top right so that the changes are applied.
The simplest flow is one that is triggered manually which then causes a debug message to be displayed. Clicking on the empty box left of the input node will cause the timestamp to be injected to the flow which will trigger a debug message to be printed on the right hand pane.
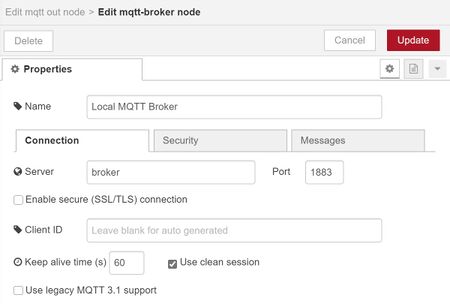
We can expand on this example by making use of MQTT. MQTT is a popular message broker that allows devices to push and receive messages based on a 'topic'. The flow can be split in two, with one pushing the timestamp into a topic and another receiving the timestamp by subscribing to the same topic. Create two flows and then configure the MQTT nodes to use the local broker.
By exposing the MQTT message broker to the network, we can have other devices publish messages to a specific topic (such as a topic for temperature from a ESP8266 sensor) and have NodeRED act on it (such as putting the temperature reading into InfluxDB).
Additional Nodes
Additional nodes can be added by installing the appropriate npm package. Since I am using docker, the suggested method by the NodeRED documentation is to build another layer on top of the existing image.
To add the InfluxDB nodes, create and build with the following Dockerfile:
FROM nodered/node-red
RUN npm install node-red-contrib-influxdb
See Also
A quick guide on using Node-RED with MQTT
| ||||||


