Tondaj SL-814
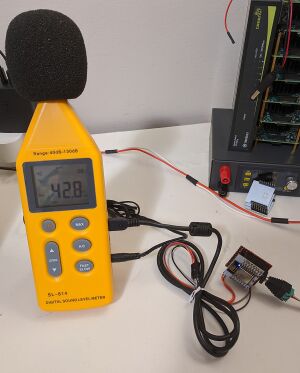
The Tondaj SL-814 is a sound level meter with a 'USB' port. This unit is not an actual USB device despite the USB device icon printed on the side. I bought this from Deal Extreme back in December 2012 for $12.55 USD when they had the 50% off sale.
The product is also called a "7-Range Sound and Noise Meter-3085".
USB Connection
The meter has an optional USB cable that can be purchased and used with their proprietary software. However the meter I bought did not come with such a cable. Using an ordinary USB mini cable does not work since the device doesn't show up as a proper USB device when connected. On further research, it appears that the USB port is used to expose the internal serial connection to the microcontroller which can be interfaced with using any TTL UART adapter or module.
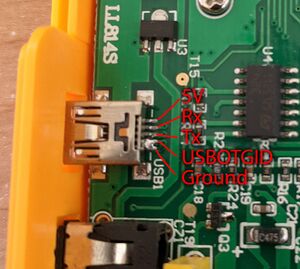
The pinouts from the USB port on this device are listed in the table below. Serial is only enabled when the USBOTGID pin is grounded; if you decide to splice a USB mini cable and it doesn't expose 5 wires, you will need to short the USBOTGID pin to ground inside the meter.
USB Mini Pinout:
| Pin | Connection | Description |
|---|---|---|
| 1 | 5V | Leave disconnected. 5V power supplied by sound meter battery. |
| 2 | Serial Rx | Connect to Tx on UART module |
| 3 | Serial Tx | Connect to Rx on UART module |
| 4 | USBOTGID | Short to ground |
| 5 | Ground | Connect to Gnd on UART module |
Protocol
Communication on the serial line is done at 9600 baud with 8e1 setting (8 data bit, even parity, 1 stop bit). The page at https://sigrok.org/wiki/Tondaj_SL-814 has the specifics on the protocol.
The following python script will poll the meter every half second:
#!/usr/bin/python3
# Tondaj SL-814 sound level meter Python script
# Copyright (C) 2012 Uwe Hermann <uwe@hermann-uwe.de>
# Released under the terms of the GNU GPL, version 2 or later.

import time
import serial

s = serial.Serial('/dev/ttyUSB0', baudrate=9600, parity=serial.PARITY_EVEN)

while 1:
    # Query
    s.write(bytes([0x30, 0x01, 0x0d]))
    result = s.read(4)
    print('%02x %02x %02x %02x' % tuple(result), end='   -   ')

    # A/C
    ac = (result[0] & (1 << 7)) >> 7
    print('A' if ac == 0 else 'C', end=', ')

    # Slow/Fast
    sl = (result[0] & (1 << 3)) >> 3
    print('Fast' if sl == 0 else 'Slow', end=', ')

    # Level
    factor = (result[0] & ((1 << 5) | (1 << 4))) >> 4
    print('Level: %d' % (40 + (int(bin(factor), 2) * 20)), end=', ')

    # Value
    val = ((result[0] & 0x7) << 8) | result[1]
    tmp_str = '%d' % val
    val_str = tmp_str[:-1] + '.' + tmp_str[-1:]
    print(val_str + ' dB')

    time.sleep(0.5)

s.close()
ESP8266 Integration
I was able to hook up an ESP8266 to the serial via USB and poll the decibel value. The value is then broadcast via MQTT which NodeRed processes and dumps into InfluxDB as a measurement.
The Arduino sketch used the same protocol as the code above.
void setup() {
	// put your setup code here, to run once:
	Serial.begin(9600, SERIAL_8E1);
	...
}

void process_data() {
	// write query
	Serial.write(0x30);
	Serial.write(0x01);
	Serial.write(0x0d);

	// read 4 bytes.
	// first 2 bytes are what we want.
	int a = Serial.read();
	int b = Serial.read();
	while (Serial.available() > 0) Serial.read();

	// got no data after timeout, do nothing.
	if (a == -1 || b == -1) {
		// try to reset the connection in case it thinks we sent
		// an invalid command.
		Serial.write(0x0d);
		while (Serial.available() > 0) Serial.read();

		// initialize
		Serial.write(0x10);
		Serial.write(0x04);
		Serial.write(0x0d);
		delay(100);
		while (Serial.available() > 0) Serial.read();
		return;
	}

	// level value is found across 11 bits.
	int level = ((a & 0x07) << 8) | (b & 0xff);

	mqtt_push_value(level);
}
Troubleshooting
Sound measurements are inaccurate
For some reason, the device sometimes shows abnormally high values in the range of 100dB while the true reading should be in the neighborhood of 50dB. This behavior occurs both on battery power and via the 9V power input.
The incorrect reading corrected itself after I accidentally tripped on the power cord causing the unit to drop and disconnect and then leaving it for a few minutes. The issue recurred again out of the blue while the unit was still powered on as visualized by the graph on the right. This was eventually 'fixed' by taking the back cover off and pressing on the back of the PCB until the readings got back to normal. Possibly bad soldering or something.


