Arduino
Arduino is a opensource hardware and software company that design cheap single board microprocessor boards in various sizes. Most boards use Atmel based microprocessors but some newer models feature ARM and Intel processors. The Arduino ecosystem is vast and there are countless opensource libraries available to interface with different components.
The official boards from Arduino's website are more expensive than the Chinese clones that are found on eBay.
Programming the Arduino Pro Mini
With a USB UART adapter
The USB UART adapter should ideally have a DTR pin which is used by the Arduino to automatically reset the device for the bootloader to receive code and also for the device to reset after the upload is complete.
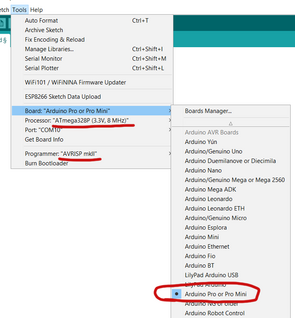
Connect the USB UART adapter to the Arduino Pro Mini board using the wiring in the table below. Ensure that the settings in the Arduino IDE is also set appropriately as pictured on the right.
I wasted a lot of time trying to diagnose why the uploads weren't working because I set the board to "Arduino Mini" rather than "Arduino Pro or Pro Mini". With the incorrect setting, the Arduino resets but code is never actually uploaded.
| Arduino Pro / Pro Mini | UART |
|---|---|
| DTR (labeled on reverse side of PCB) | DTR |
| TX | RX |
| RX | TX |
| GND | GND |
| Vcc | 5V |
With another Arduino board
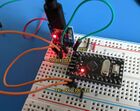
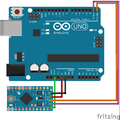
If you don't have a USB-UART adapter, you can use a regular Arduino Uno or Duemilanove to program an Arduino Mini with these steps.
- Connect GND and VCC from the Arduino Uno/Duemilanove to the Arduino Mini/Nano
- Pull the ATmega 328 microprocessor from DIP socket on the Arduino Uno/Duemilanove board
- Connect RX (Pin 0), TX (Pin 1), Reset (RST) from the Arduino Uno/Duemilanove to RXI, TXO, RST pins on the Arduino Mini/Nano respectively.
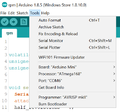
Then program the Arduino as you normally would while making sure that the board selected in the Arduino IDE is set to the Arduino Mini or Nano.
If you're having issues uploading, make sure the settings look like the image below.
Types
There are various types of Arduino boards. The ones I have are listed below.
| Parametrics | ATmega168 | ATmega328 | ATmega 32U4 | ATmega2560 |
|---|---|---|---|---|
| Memory Size (flash) | 16 KB | 32 KB | 32 KB | 256 KB |
| CPU Speed | 20 MIPS | 16 MIPS | ||
| SRAM Size | 1024 bytes | 2048 bytes | 2560 bytes | 8192 bytes |
| EEPROM/HEF Size | 512 bytes | 1024 bytes | 4096 bytes | |
| Pin Count | 32 | 44 | 100 | |
| Operating Voltage | 1.8v - 5.5v | 2.7v - 5.5v | 1.8v - 5.5v | |
| Operating Temperatures | -40C to 150C | -40C to 85C | ||
Arduino Duemilanove
Duemilanove is Italian for 2009. This is the first Arduino I obtained and comes with an ATmega168 in a DIP package.
Arduino Nano
Nanos have the USB mini connector for power and serial. These are typically around $2.25 USD each.
Arduino Pro Mini
Not all Arduino Pro Minis from eBay have the same microprocessor. Some have the Atmel ATmega168 while others have the ATmega328. The differences are listed in the following table.
Without looking too closely, these following two boards look identical but actually has a different microprocessor.
While the differences are slight, the ATmega168 has half the memory capacity and EEPROM size.
Arduino Mega 2560
Arduino Mega has an Atmel ATmega2560 as the main microprocessor as well as a secondary Atmel ATmega 16u2 driving the UART. These cost about $18 USD each.
The ATmega 16u2 microprocessor can be updated with a different firmware to make this Arduino appear as a USB HID device (such as making the Arduino appear as a USB keyboard). This is done by making the Arudino enter DFU mode and then uploading a new firmware with a utility called Flip. You can learn more at the Arduino Mega page.
https://store.Arduino.cc/usa/mega-2560-r3
Arduino and Raspberry Pi Serial Integration
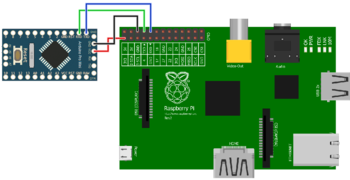
To make the Arduino talk directly to the Pi via the UART pins, keep in mind that the Arduino communicates at 5v while the Raspberry Pi can only work with 3.3v.
A possible hack is to run the Arduino at 3.3v rather than 5v and then connect:
- Arduino Pin 0 (RXI) to Raspberry Pi Pin 8 (UART0_TXD)
- Arduino Pin 1 (TXO) to Raspberry Pi Pin 10 (UART0_RXD)
This gets around needing to step up/down the voltages from 3.3v to 5v since everything will be at 3.3v.
If everything works, you should be able to talk with the Arduino via the serial device. See the Raspberry Pi Serial page
Neat Projects
Some neat projects using the Arduino
- Arduino MEGA Logic Analyzer - http://www.soasystem.com/eng/amla/
- 328eForth - https://playground.Arduino.cc/CommonTopics/ForthOnArduino/, https://github.com/DRuffer/328eforth
